前回記事で、VMwareで使用していた仮想マシンの仮想ハードディスクが分割されていたのを結合し、1つにして下準備が整ったので、VirtualBoxへ仮想マシンを移行する方法です。
※ただし、今回の移行方法では、この仮想マシンではないものを移行します。
◆移行方法
移行方法として次の2つの方法で実施してみました。
- OVF(Open Virtualization Format)ファイルに変換して、VirtualBoxでインポートする方法
- VMwareの仮想ハードディスク形式(VMDK)のまま移行する方法
今回は、タイトルにもあるとおり、1のOVF変換編として移行する方法を実施します。
◆OVFへの変換
OVFへの変換には、次の方法があります。
- VMwareのエクスポート機能を使用する方法
- OVF Tool(Open Virtualization Format Tool)を使用して変換する方法
1の方法については、過去記事「VMwareからVirtualBoxへ仮想マシンの移行」で実施しているので、今回は2の方法で実施します。
◆OVF Toolとは
VMwareのOVF Toolのページでは、次のように概要説明があります。
VMware OVF Toolは、多くのVMware製品との間でOVFパッケージをインポートおよびエクスポートするのに役立つコマンドラインユーティリティです。
VMware Developer Open Virtualization Format (OVF) Tool
ツールは、VMwareをインストールすると一緒にパッケージもインストールされていますが、なければ別途ダウンロードすることもできます。
・OVF Toolの場所
VMwareをインストールしたディレクトリ、通常は、「C:\Program Files\VMware\VMware Workstation\OVFTool\」ディレクトリに「ovftool.exe」があります。
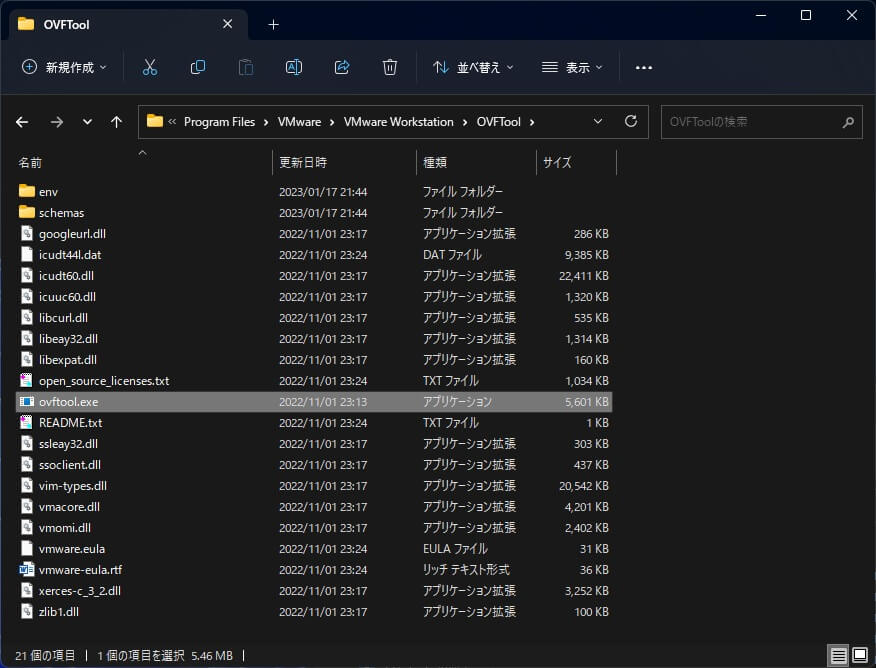
私の環境では、Cドライブではなく、Dドライブになります。
◆ツールの起動
「ovftool.exe」は、コマンドラインツールなのでコマンドプロンプトから使用します。
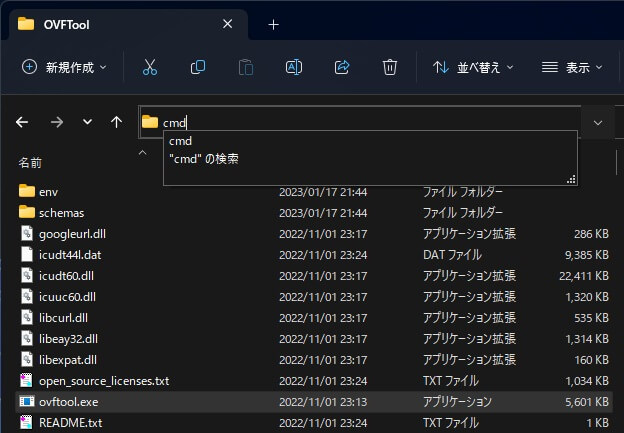
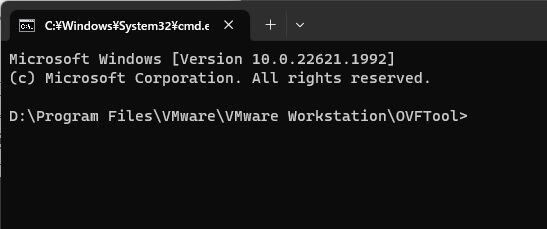
エクスプローラーで、「ovftool.exe」ディレクトリを表示し、アドレスバーに「cmd」と入力して「Enter」キーを押します。
すると、エクスプローラーで表示されているディレクトリでコマンドプロンプトが起動されます。
・ヘルプ
>ovftool.exe --help
Usage: ovftool [options] <source> [<target>]
where
<source>: Source URL locator to an OVF package, VMX file, or virtual machine in
vCenter or on ESX Server.
<target>: Target URL locator which specifies either a file location, or a
location in the vCenter inventory or on an ESX Server.
If <target> is not specified, information about the source is displayed to the
console.
Options:
--acceptAllEulas : Accept all end-user licenses agreements
without being prompted.
--addDevice : Adds a virtual device for all
VirtualHardwareSections. The syntax is
--addDevice:<type>[=<opt1>=<val1>[,<opt2>=<val2>...]].
Device type currently can be only 'vtpm'.
Valid options for vTPM devices are:
required(true, false), name(text). Applies
to vi, vmx, vapprun, vCloud, ovf, and ova
source locators.
--allowAllExtraConfig : Whether we allow all the ExtraConfig
options. These options are a security risk
as they control low-level and potential
unsafe options on the VM.
--allowExtraConfig : Whether we allow ExtraConfig options. These
options are a security risk as they control
low-level and potential unsafe options on
the VM.
--annotation : Add annotation to vi, vmx, vapprun, vCloud,
OVF, and OVA source locators
--authdPortSource : Use this to override default vmware authd
port (902) when using a host as source.
--authdPortTarget : Use this to override default vmware authd
port (902) when using a host as target.
--chunkSize : Specifies the chunk size to use for files in
a generated OVF package. The default is not
to chunk. The chunk size without unit is
assumed to be in megabytes. Accepted units
are b, kb, mb, gb; e.g., 2gb or 100kb.
--compress : Compress the disks in an OVF package. Value
must be between 1 and 9. 1 is the fastest,
but gives the worst compression, whereas 9
is the slowest, but gives the best
compression.
--computerName : Sets the computer name in the guest for a VM
using the syntax --computerName:<VM
ID>=<value>. Only applies to vCloud targets
version 5.5 or newer.
--configFile : Configuration file to use to load options
from.
--coresPerSocket : Specifies the distribution of the total
number of CPUs over a number of virtual
sockets using the syntax
--coresPerSocket:<VM ID>=<value>. Only
applies to vCloud targets version 5.5 or
newer.
-ds/--datastore : Target datastore name for a VI locator.
--decodeBase64 : Decode option values with Base64.
--defaultStorageProfile : The storage profile for all VMs in the OVF
package. The value should be an SPBM profile
ID. Only applies to VI targets version 5.5
or newer.
--defaultStorageRawProfile : The storage profile for all VMs in the OVF
package. The value should be raw SPBM
profile. The value will overwrite that in
--defaultStorageProfile. Only applies to VI
targets version 5.5 or newer.
--deploymentOption : Selects what deployment option to use (if
the source OVF package supports multiple
options.)
--disableVerification : Skip validation of signature and
certificate.
-dm/--diskMode : Select target disk format. Supported formats
are: monolithicSparse, monolithicFlat,
twoGbMaxExtentSparse, twoGbMaxExtentFlat,
seSparse (VI target), eagerZeroedThick (VI
target), thin (VI target), thick (VI
target), sparse, and flat
--diskSize : Sets the size of a VM disk in megabytes
using the syntax --diskSize:<VM ID>,<disk
instance ID>=<value>. Only applies to vCloud
targets version 5.5 or newer.
--eula : EULA to be inserted in the first virtual
system or virtual system collection in the
OVF. If the EULA is in a file, use the
option --eula@=filename instead.
--exportDeviceSubtypes : Enables export of resource subtype for
CD/Floppy/Parallel/Serial devices. This can
limit portability as not all device backings
are supported on all hypervisors. The
default is false.
--exportFlags : Specifies one or more export flags to
control what gets exported. The supported
values for VI sources are mac, uuid, and
extraconfig. Supported value for vCloud
sources are preserveIdentity. One or more
options can be provided, separated by
commas.
--extraConfig : Sets an ExtraConfig element for all
VirtualHardwareSections. The syntax is
--extraConfig:<key>=<value>. Applies to vi,
vmx, vapprun, vCloud, ovf, and ova source
locators.
--fencedMode : If a parent network exists on the vCloud
target, this property specifies the
connectivity to the parent. Possible values
are bridged, isolated, and natRouted.
-h /--help : Prints this message.
--hideEula : In OVF probe mode, hides the EULA.
--importAsTemplate : Import VM as a Template when deployed on a
VI target.
--ipAllocationPolicy : IP allocation policy for a deployed OVF
package.Supported values are: dhcpPolicy,
transientPolicy, fixedPolicy,
fixedAllocatedPolicy.
--ipProtocol : Select what IP protocol to use (IPv4, IPv6).
--lax : Relax OVF specification conformance and
virtual hardware compliance checks. Use only
if you know what you are doing.
--locale : Selects locale for target.
--machineOutput : Output OVF Tool messages in a machine
friendly manner.
--makeDeltaDisks : Build delta disk hierarchy from the given
source locator.
--maxVirtualHardwareVersion : The maximal virtual hardware version to
generate.
--memorySize : Sets the memory size in megabytes of a VM
using the syntax --memorySize:<VM
ID>=<value>. Only applies to vCloud targets
version 5.5 or newer.
--multiDatastore : List of target datastore names for a VI
locator. datastore assignment is set using
the syntax
--mdatastore:<ovf:diskId>=<targetdatastore-name>.
multiple mds parameteres are used to specify
multiple datastore mappings. e.g.
--mdatastore:vmdisk1=datastore1
--mdatastore:vmdisk2=datastore2
The multi datastore flags can not be used
along with --datastore flag.
-n /--name : Specifies target name (defaults to source
name).
--net : Set a network assignment in the deployed OVF
package. A network assignment is set using
the syntax --net:<OVF name>=<target name>.
If the target is vCloud 5.5 or newer, a
fence mode can also be specified using the
syntax --net:<OVF name>=<target name>,<fence
mode>. Possible fence mode values are:
bridged, isolated, and natRouted.
-nw/--network : Target network for a VI deployment.
--nic : Specifies NIC configuration in a VM using
the syntax --nic:<VM ID>,<index>=<OVF net
name>,<isPrimary>,<ipAddressingMode>,<ipAddress>.
Possible values for ipAddressingMode are:
DHCP, POOL, MANUAL, and NONE. ipAddress is
optional and should only be used when
ipAddressingMode is set to MANUAL. Only
applies to vCloud targets version 5.5 or
newer.
--noDestinationSSLVerify : Skip SSL verification for target VI
connections.
--noDisks : Disable disk conversion.
--noImageFiles : Do not include image files in destination.
--noNvramFile : Do not include nvram file in destination.
--noProxyVerify : Skip Proxy SSL verification.
--noSSLVerify : Skip SSL verification for VI connections.
--noSourceSSLVerify : Skip SSL verification for source VI
connections.
--numberOfCpus : Sets the number of CPUs for a VM using the
syntax --numberOfCpus:<VM ID>=<value>. Only
applies to vCloud targets version 5.5 or
newer.
-o /--overwrite : Force overwrites of existing files.
--packageCert : Package a source OVF files with a
certificate file into an OVA as is with no
modifications.
--parallelThreads : Specifies how many threads should be used
for parallel transfer.
--powerOffSource : Ensures a VM/vApp is powered off before
importing from a VI source.
--powerOffTarget : Ensures a VM/vApp is powered off before
overwriting a VI target.
--powerOn : Powers on a VM/vApp deployed on a VI target.
--preCheck : Require pre check validations before
import/export, default is true
--privateKey : Sign OVF package with the given private key
(.pem file). The file must contain a private
key and a certificate.
--privateKeyPassword : Password for the private key. Should be used
in conjunction with privateKey if the
private key requires password
authentication. If required and not
specified, the tool will prompt for the
password.
--prop : Set a property in the deployed OVF package.
A property is set using the syntax
--prop:<key>=<value>.
--proxy : Proxy used for HTTP[S] access.
--proxyCert : Specify full path to Proxy Certificate.
--proxyNTLMAuth : Enable NTLM authentication for proxy.
--proxyPassword : Proxy password.
--proxyUsername : Proxy user name.
--pullUploadMode : Pull mode used in uploading files to VI
target, i.e. target pulls files.
-q /--quiet : No output to screen except errors.
--requireSignature : Require validation of signature and
certificate.
--schemaValidate : Validate OVF descriptor against OVF schema.
--shaAlgorithm : Select SHA digest algorithm when creating
OVF package. Supported values are SHA1,
SHA256 and SHA512. Default value is SHA256.
--signCommand : User callback to sign a manifest (.mf) file.
The command will take the .mf file as a
single argument and should generate a
complimentary .cert in the same directory.
--skipManifestCheck : Skip validation of OVF package manifest.
--skipManifestGeneration : Skip generation of OVF package manifest.
--sourcePEM : File path to PEM formatted file used to
verify VI connections.
--sourceSSLThumbprint : SSL fingerprint of SOURCE. OVF Tool verifies
the SSL fingerprint it gets from SOURCE if
the value is set.
-st/--sourceType : Explicitly express that source is OVF, OVA,
VMX, VI, vCloud, ISO, FLP, vApprun
--sslCipherList : Use this to override default OpenSSL ciphers
suite.
--sslVersion : Use this to set preferred TLS/SSL version
for HTTPS connections. The valid values are
as following:
TLSv1_0: Set preferred TLS/SSL version to
TLSv1.0.
TLSv1_1: Set preferred TLS/SSL version to
TLSv1.1.
TLSv1_2: Set preferred TLS/SSL version to
TLSv1.2.
--storageProfile : Sets the storage profile for a VM using the
syntax --storageProfile:<VM ID>=<value>.
Only applies to vCloud targets version 5.5
or newer.
--targetPEM : File path to PEM formatted file used to
verify VI connections.
--targetSSLThumbprint : SSL fingerprint of TARGET. OVF Tool verifies
the SSL fingerprint it gets from TARGET if
the value is set.
-tt/--targetType : Explicitly express that target is OVF, OVA,
VMX, VI, vCloud, ISO, FLP, vApprun
--vCloudTemplate : Create only a vApp template. Default value
is false
--vService : Set a vService assignment in the deployed
OVF package. A vService assignment is set
using the syntax
--vService:<dependencyId>=<providerId>.
--verifyOnly : Do not upload the source but only verify it
against the target host. Applies to VI 4
targets only.
--verifyViTargetManifest : Verify Sha1 digest of deployed files on a VI
target.
-v /--version : Prints the version of this tool.
--viCpuResource : Specify the CPU resource settings for
VI-locator targets. The syntax is
--viCpuResource=<shares>:<reservation>:<limit>.
--viMemoryResource : Specify the CPU resource settings for
VI-locator targets. The syntax is
--viMemoryResource=<shares>:<reservation>:<limit>.
-vf/--vmFolder : Target VM folder in VI inventory (relative
to datacenter).
For more help, type: --help <topic>, where topics are:
locators : For detailed source and destination locator syntax
examples : For examples of use
config : For syntax of configuration files
debug : For debug purpose
integration : For a list of options primarily used when ovftool is exec'ed
from another tool or shellscript.
1行目:「ovftool.exe –help」で、ヘルプを表示
今回は、特にオプション指定はしないので説明は割愛します。
◆コマンドの実行
移行する仮想マシンのディレクトリをエクスプローラーで表示します。
>ovftool.exe "D:\Virtual Machines\REMnuxVM\REMnuxVM.vmx" "D:\REMnuxVM.ovf"

Opening VMX source: D:\Virtual Machines\REMnuxVM\REMnuxVM.vmx
Opening OVF target: D:\REMnuxVM.ovf
Writing OVF package: D:\REMnuxVM.ovf
Transfer Completed
Completed successfully
1行目:「ovftool.exe Source_vmx Destination_ovf」で実行します。
ソースファイル及び出力先ディレクトリは、ドラッグ&ドロップし、出力先ファイル名のみ入力すると間違いがなくていいと思います。

◆仮想マシンのインポート
変換したOVFファイルをVirtualBoxへインポートします。
VirtualBoxを起動し、「ツール」を表示します。
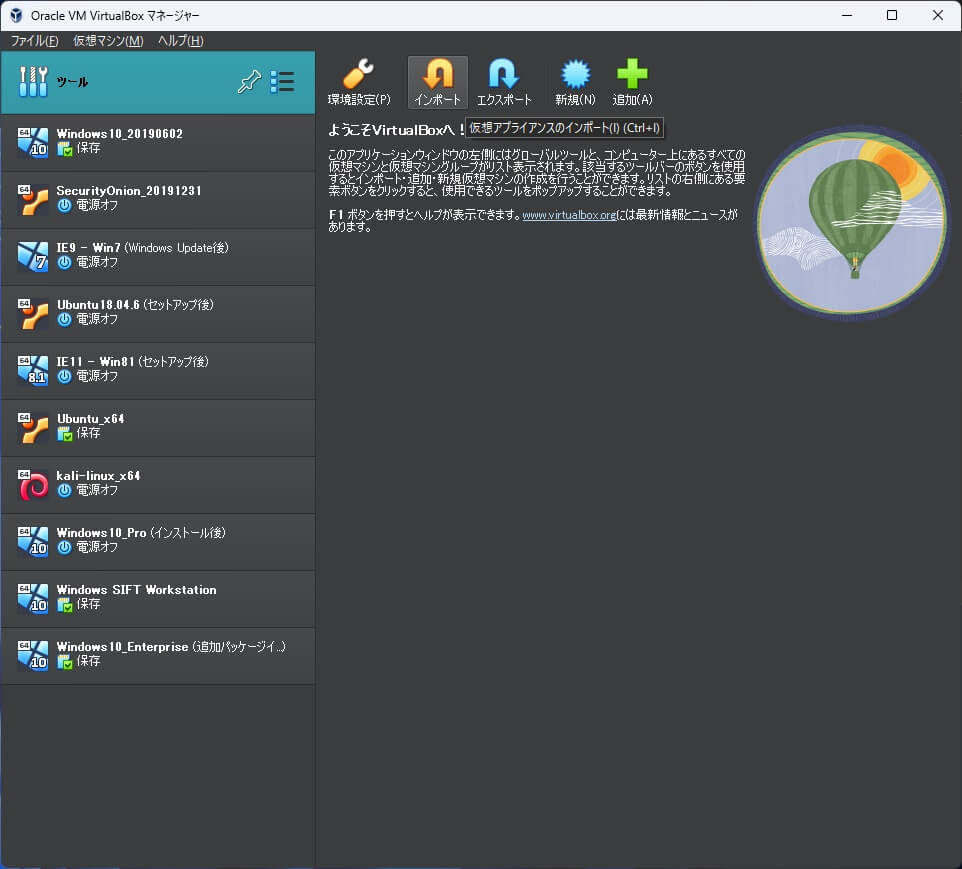
「ツール」の上部アイコンから「インポート」をクリックします。
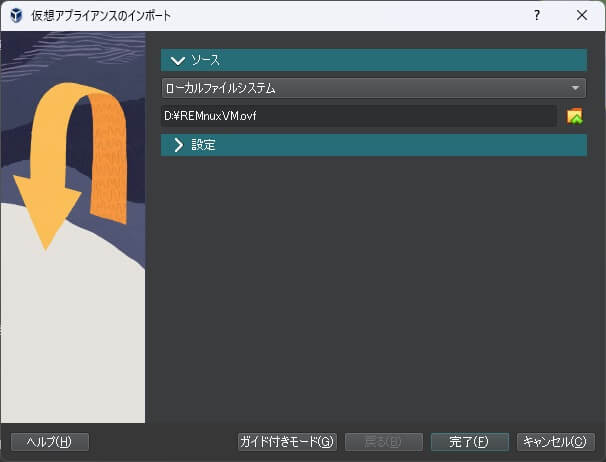
「仮想アプライアンスのインポート」画面が表示されるので、「ソース」から変換した「OVF」ファイルを選択します。
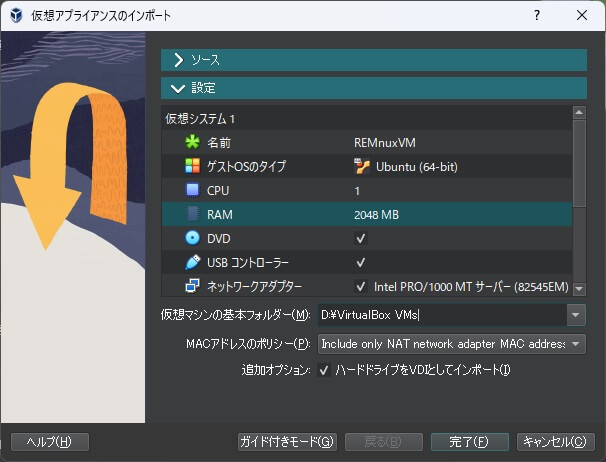
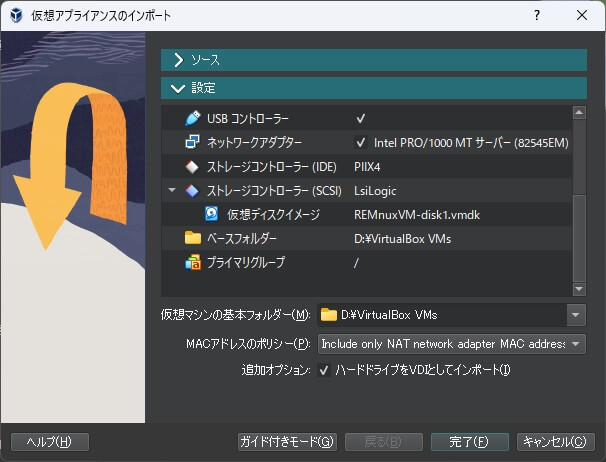
次に「設定」を開き、名前やRAM、仮想ディスクイメージなどを確認・設定します。
その際、追加オプションの「ハードドライブをVDIとしてインポート」にチェックを付けます。
チェックを付けない場合、「VMDK」ファイルのままインポートすることもできます。
※ここでいう、VMDKファイルのままインポートは、結果は一緒ですが、最初の移行方法2の手段とは違います。詳しくは次回の記事で。
確認がよければ、「完了」をクリックします。
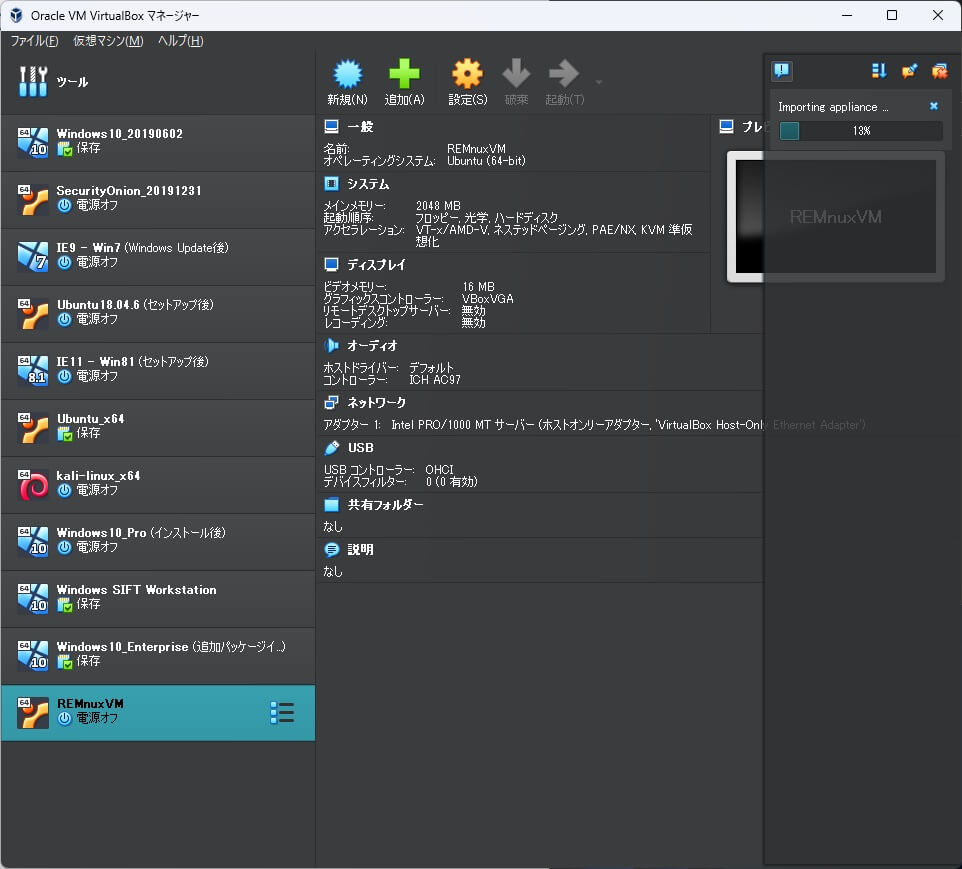
仮想マシンのインポートが開始されます。
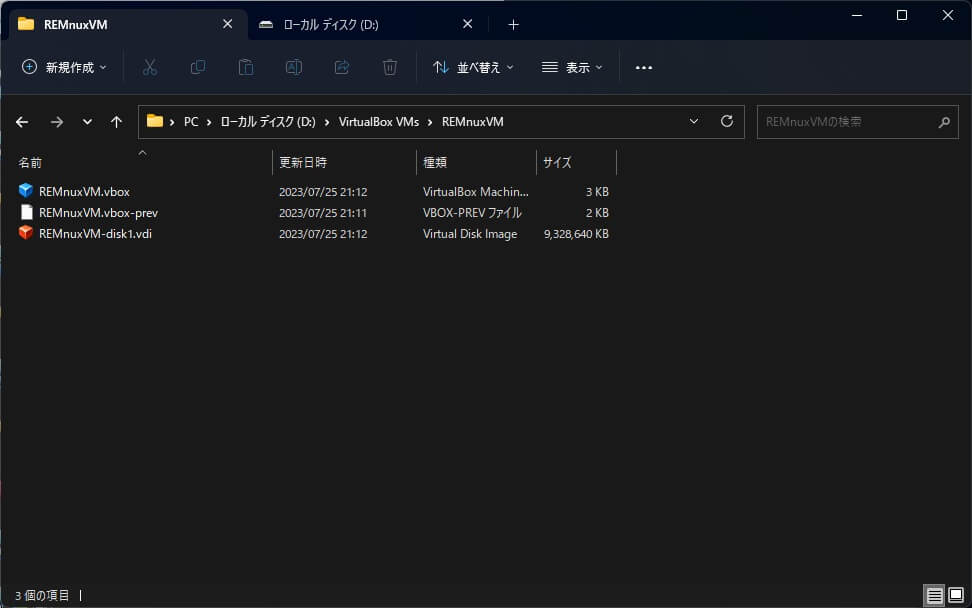
仮想マシンのインポートが完了後、仮想マシンのディレクトリを確認すると、仮想ハードディスクが「VDI」ファイルに変換されてインポートされているのがわかります。
◆仮想マシンの設定
「Oracle VM VirtualBox マネージャー」でインポートした仮想マシンを選択し、「設定」をクリックします。
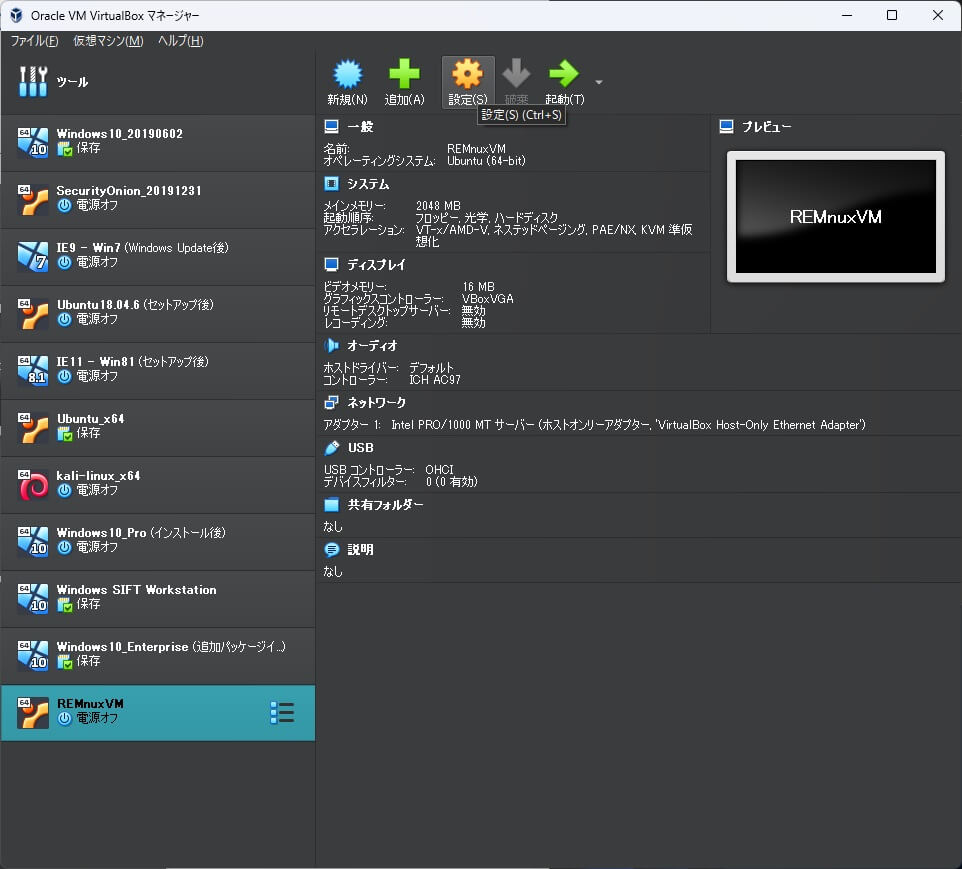
仮想マシンの設定画面が開くので、「ストレージ」を選択します。
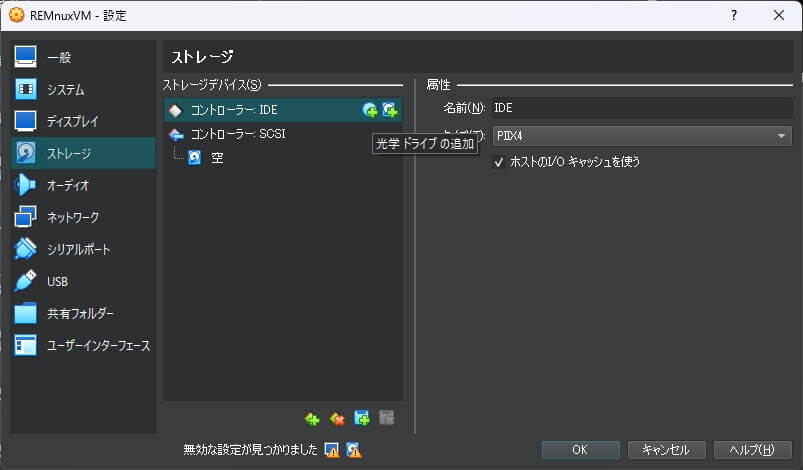
ストレージの「ストレージデバイス」で「コントローラー IDE」に光学ドライブを追加します。
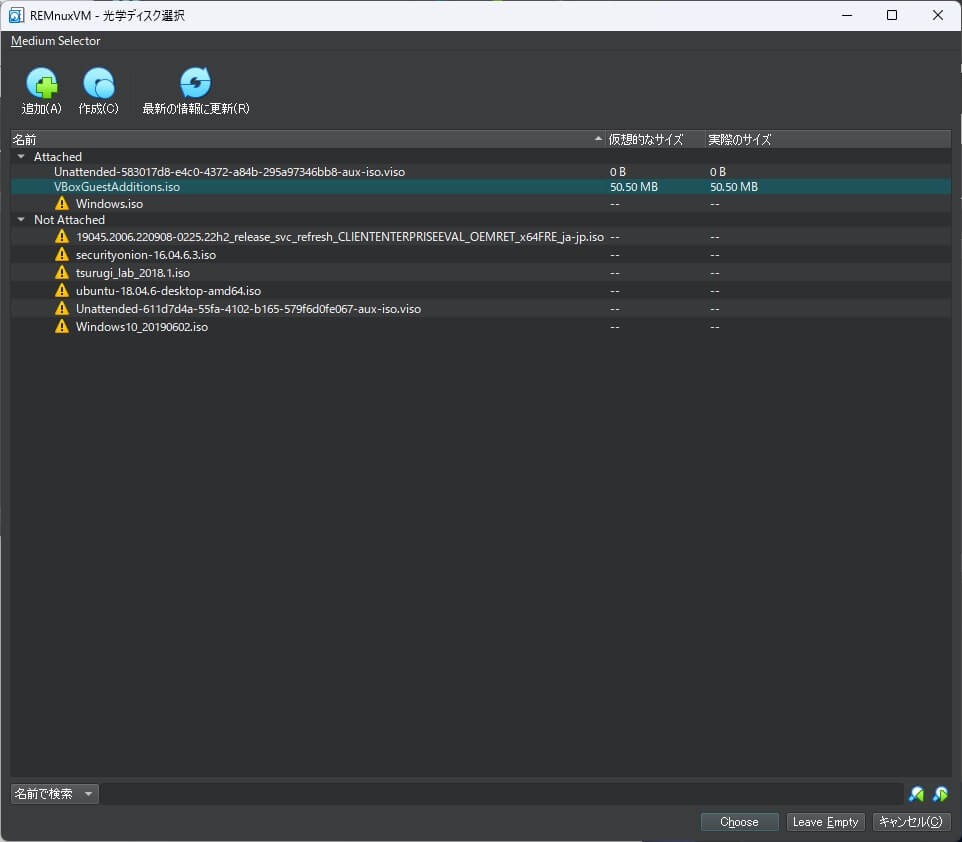
次に「光学ディスク選択」画面が表示されるので、拡張機能パックの「VBoxGuestAdditions.iso」を指定します。
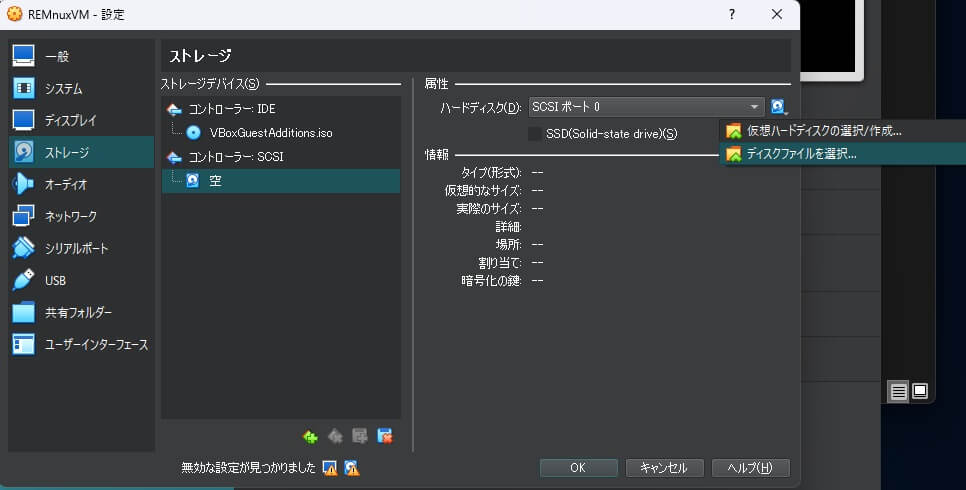
次に仮想ハードディスクがマウントされていないので、「コントローラー SCSI」の「空」になっているハードディスクを選択し右上のアイコンから「ディスクファイルを選択」をクリックします。
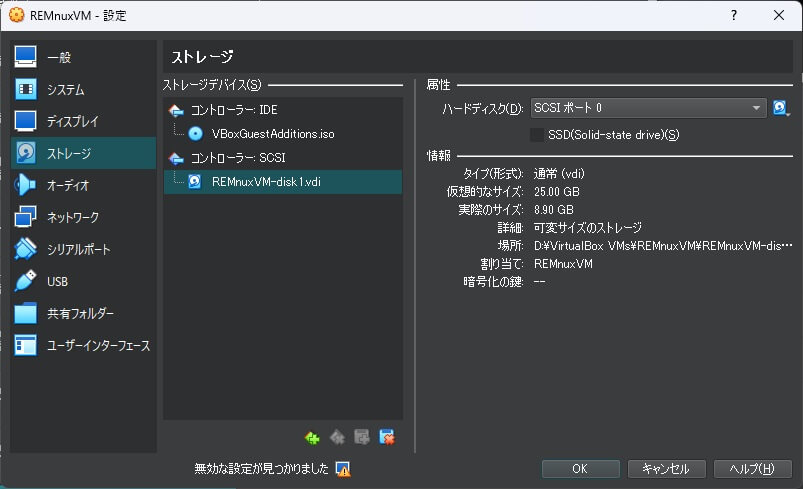
インポートした仮想ハードディスクである「VDI」ファイルを選択してマウントし、「OK」をクリックして「設定」画面を閉じます。
◆仮想マシンの起動
仮想マシンの上部アイコンから「起動」をクリックして仮想マシンを起動します。
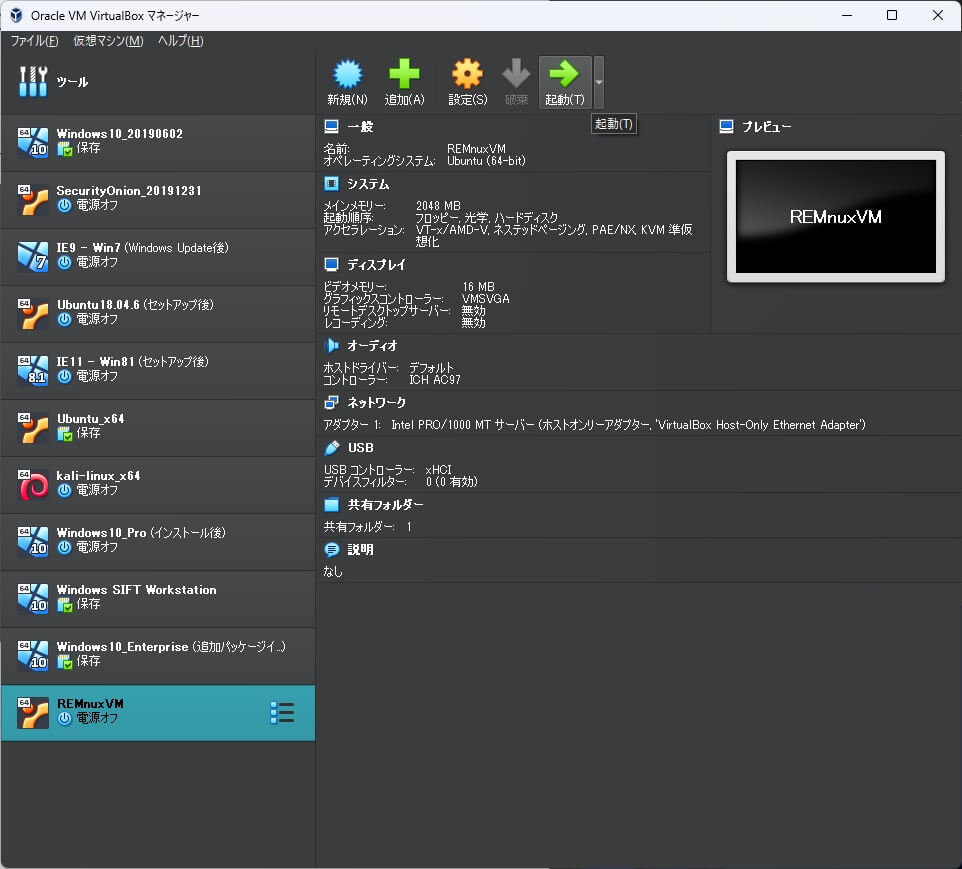
問題なく起動されました。
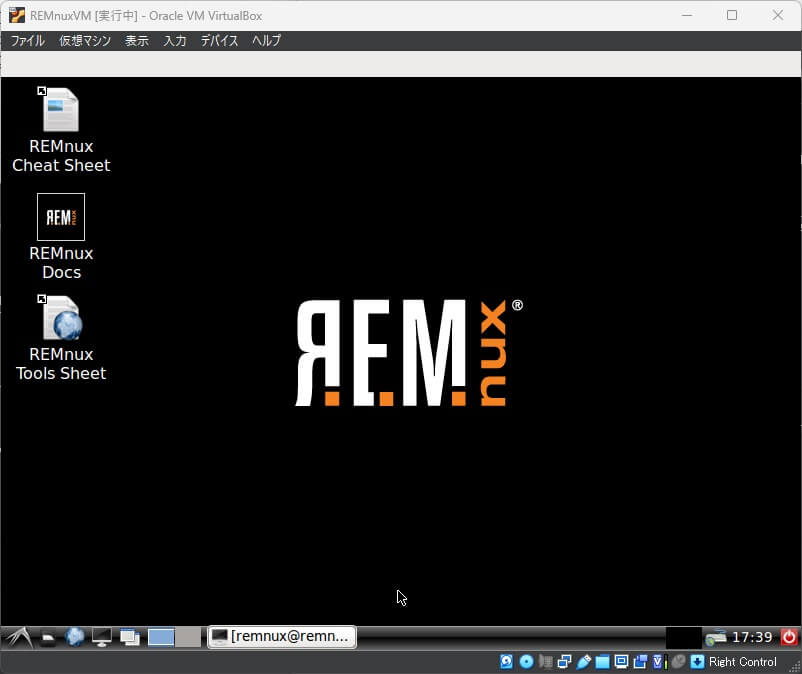
あとは、光学ディスクにマウントしたGuestAdditionsを追加するだけですが、上手くいかなかったので保留にしています。
今回は、VMwareのツールOVF Toolを使用して、OVFファイルに変換し、VirtualBoxへ移行する方法でした。
次回は、VMDKファイルのまま移行する方法を書きたいと思います。

