前回、VPSにサブドメインとWordPressを追加する方法を書いたが、SSLサーバ証明書のドメインがメインの「www」にしか対応していないため、ワイルドカード証明書を取得してサブドメインへもSSL通信を可能とする

# certbot certonly --manual --server https://acme-v02.api.letsencrypt.org/directory --preferred-challenges dns -d *.ドメイン名 -d ドメイン名 -m XXX@mail.com --agree-tos --manual-public-ip-logging-ok

~ 中略 ~

Please deploy a DNS TXT record under the name
_acme-challenge.ドメイン名 with the following value:

X8x3XXbe1b13H1Xe4Xx44uPXEsF12HxOLu73JbZXX4x

Before continuing, verify the record is deployed.
- - - - - - - - - - - - - - - - - - - - - - - - - - - - - - - - - - - - - - - -
Press Enter to Continue
1行目:certbotコマンドの実行
サブドメイン有りと無しの2つを指定します
※細部オプションは、certbotコマンドのユーザガイドまたはcertbot –help allコマンドで
確認してください
6行目:_acme-challenge.ドメイン名
8行目:認証用トークン
12行目:ここで、一時停止して6行目と8行目の内容をDNSにTXTレコードで追加する必要があります
私は、お名前.comを利用していますので、ドメイン設定からDNSレコード設定ページで追加します
追加後、反映されるまで時間がかかりますので、ターミナルをもう1枚起動して確認します
# nslookup -type=TXT _acme-challenge.ドメイン名
Server:         XXX.XXX.XXX.XXX
Address:        XXX.XXX.XXX.XXX#53

Non-authoritative answer:
_acme-challenge.ドメイン名  text = "X8x3XXbe1b13H1Xe4Xx44uPXEsF12HxOLu73JbZXX4x"
# dig _acme-challenge.ドメイン名 TXT

; <<>> DiG 9.11.4-P2-RedHat-9.11.4-26.P2.el7_9.4 <<>> _acme-challenge.ドメイン名 TXT
;; global options: +cmd
;; Got answer:
;; ->>HEADER<<- opcode: QUERY, status: NOERROR, id: 61870
;; flags: qr rd ra; QUERY: 1, ANSWER: 2, AUTHORITY: 4, ADDITIONAL: 8

;; OPT PSEUDOSECTION:
; EDNS: version: 0, flags:; udp: 4096
;; QUESTION SECTION:
;_acme-challenge.ドメイン名.        IN      TXT

;; ANSWER SECTION:
_acme-challenge.ドメイン名. 2999 IN TXT     "X8x3XXbe1b13H1Xe4Xx44uPXEsF12HxOLu73JbZXX4x"
nslookupまたはdigコマンドで登録したTXTレコードが返ってくることを確認します
確認出来たら、元のターミナルで継続します
Waiting for verification...
Resetting dropped connection: acme-v02.api.letsencrypt.org
Cleaning up challenges
Use of --manual-public-ip-logging-ok is deprecated.

IMPORTANT NOTES:
 - Congratulations! Your certificate and chain have been saved at:
   /etc/letsencrypt/live/ドメイン名/fullchain.pem
   Your key file has been saved at:
   /etc/letsencrypt/live/ドメイン名/privkey.pem
   Your certificate will expire on 2021-06-12. To obtain a new or
   tweaked version of this certificate in the future, simply run
   certbot again. To non-interactively renew *all* of your
   certificates, run "certbot renew"
 - If you like Certbot, please consider supporting our work by:

   Donating to ISRG / Let's Encrypt:   https://letsencrypt.org/donate
   Donating to EFF:                    https://eff.org/donate-le
SSL証明書ファイルが生成されたので確認します
 ll /etc/letsencrypt/live/ドメイン名
合計 4
-rw-r--r-- 1 root root 692  3月 14 13:58 README
lrwxrwxrwx 1 root root  38  3月 14 13:58 cert.pem -> ../../archive/ドメイン名/cert1.pem
lrwxrwxrwx 1 root root  39  3月 14 13:58 chain.pem -> ../../archive/ドメイン名/chain1.pem
lrwxrwxrwx 1 root root  43  3月 14 13:58 fullchain.pem -> ../../archive/ドメイン名/fullchain1.pem
lrwxrwxrwx 1 root root  41  3月 14 13:58 privkey.pem -> ../../archive/ドメイン名/privkey1.pem
SSLサーバ証明書設定ファイル(ssl.conf)の修正
# vi /etc/httpd/conf.d/ssl.conf
SSLCertificateFile /etc/letsencrypt/live/ドメイン名/cert.pem
SSLCertificateKeyFile /etc/letsencrypt/live/ドメイン名/privkey.pem
SSLCertificateChainFile /etc/letsencrypt/live/ドメイン名/chain.pem
2~4行目:生成されたファイルのパスを各該当行において修正します
Apacheの再起動
# systemctl reload httpd
1行目:httpdのリロード
cron設定については、ワイルドカード証明書に変更後も変化はないのでそのままにしています
# vi /etc/cron.d/letsencrypt
5 0 1 * * root /usr/bin/certbot renew --force-renewal --post-hook '/usr/bin/systemctl reload httpd.service'
2行目:毎月1日00:05に更新するように設定
※有効期限は90日ですが、失敗することも考慮し、毎月更新としています
ブラウザで証明書の確認
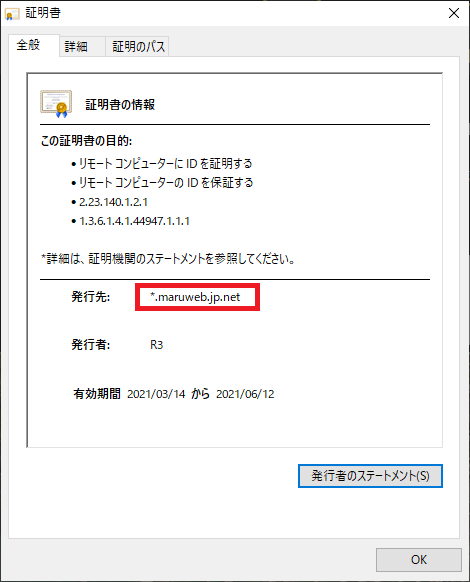
当サイトの証明書ですが、問題なくワイルドカード証明書となっているのが確認できました
あとは、cronで更新ができることを確認後、今まで使用していた証明書を削除したいと思います
追記:
cronによる自動更新ができないようなので手動による更新方法の記事を書きました。
Let’s EncryptワイルドカードSSLサーバ証明書更新